
3 Element wire yagi
![]() Another
antenna that I've built and works well, giving good DX results throughout the 11 metre
band. Because the antenna is based in the attic, It's best used as a fixed antenna system
as turning an antenna of this size is quite difficult in a small attic.
Another
antenna that I've built and works well, giving good DX results throughout the 11 metre
band. Because the antenna is based in the attic, It's best used as a fixed antenna system
as turning an antenna of this size is quite difficult in a small attic.

![]() For
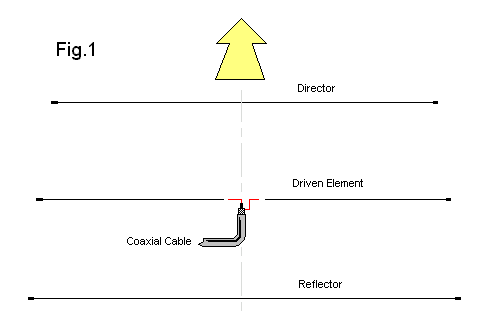
this, I used a length of 20S.W.G. (1.0mm) single core wire (but anything will do) and cut
to the sizes in the table below. However some trial & error is needed as this
calculation varies for a number of reasons ie. height above groung, wire size used and
even influenced by nearby objects.
For
this, I used a length of 20S.W.G. (1.0mm) single core wire (but anything will do) and cut
to the sizes in the table below. However some trial & error is needed as this
calculation varies for a number of reasons ie. height above groung, wire size used and
even influenced by nearby objects.
| Element | Dimensions |
| Reflector | 5.283m |
| Driven | 4.860m |
| Director | 4.440m |
| Spacing | 1.270m |
![]() NOTE:-
At this point may I suggest cutting the wire length longer than is needed as
it's alot easier to shorten the element length than add bits on.
NOTE:-
At this point may I suggest cutting the wire length longer than is needed as
it's alot easier to shorten the element length than add bits on.
![]() The
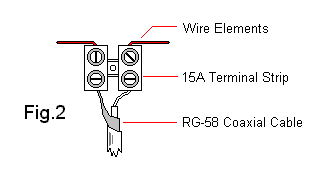
feed to the antenna is easy as the feed impeadance of the yagi is around 40-80 Ohms, thus
a good match for 50 Ohm (RG-58) coaxial cable. As with the Inverted Vee antenna I used a
15 Amp terminal strip for the feed connections but a number of choices are available. See
below Fig.2
The
feed to the antenna is easy as the feed impeadance of the yagi is around 40-80 Ohms, thus
a good match for 50 Ohm (RG-58) coaxial cable. As with the Inverted Vee antenna I used a
15 Amp terminal strip for the feed connections but a number of choices are available. See
below Fig.2

![]() Once
the connection to the antenna is made then I used drawing pins to support the wire
elements during testing. On a low power setting, check the S.W.R. throughout the band (say
27.555 Mhz is the target). Remember If the S.W.R. is lower on the lower frequencies then
the antenna element will need shortening and visa versa. Below (Fig.3) I've shown the
results of testing I carried out when Installing the antenna.
Once
the connection to the antenna is made then I used drawing pins to support the wire
elements during testing. On a low power setting, check the S.W.R. throughout the band (say
27.555 Mhz is the target). Remember If the S.W.R. is lower on the lower frequencies then
the antenna element will need shortening and visa versa. Below (Fig.3) I've shown the
results of testing I carried out when Installing the antenna.
| Test Conditions : Power = 2.0W Mode = F.M. Target frequency = 27.00Mhz | ||||||||||||
|
![]() Once all the trimming is done then the elements can be secured to
the rafters using what ever method you prefer. However to be honest I left it with the
drawing pin supports. Later I added a 1:1 balun at the feed point which made the antenna
work over a wider band ie. gave the antenna a larger bandwidth. For More Information about
the balun I made click here or on the menu toolbar.
Once all the trimming is done then the elements can be secured to
the rafters using what ever method you prefer. However to be honest I left it with the
drawing pin supports. Later I added a 1:1 balun at the feed point which made the antenna
work over a wider band ie. gave the antenna a larger bandwidth. For More Information about
the balun I made click here or on the menu toolbar.